Make Your Own Igitenge Bags
By Christa Pugh
This project is a great way to use up a little igitenge (and a few hours on a
rainy day). All you need are some basic sewing skills and a few simple
materials!
Materials
Igitenge
Lining fabric (I use satiny material, available at any fabric store, but you
could also use a solid cotton or even igitenge if you prefer)
Printed pattern from the following page
Scissors
Needle and thread
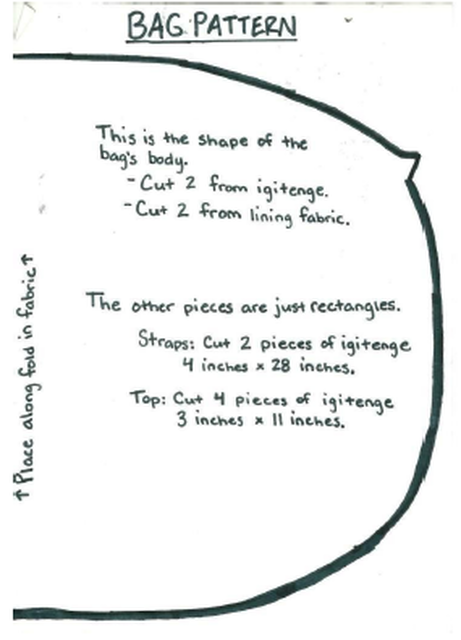
1. Cut out the pieces using the pattern.
2. Sew the straps.
Fold in half lengthwise and sew – you‘re basically making a long, skinny tube. When you‘re done sewing, turn it inside out and iron flat. (If you don‘t have an iron, get it wet and lay flat to dry.) Repeat with the second strap.
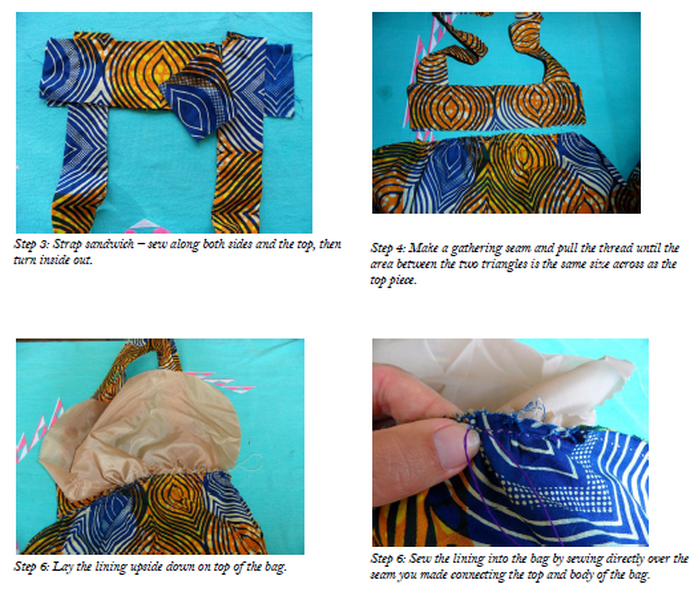
3. Sew the top of the bag.
Make a sandwich with the two ends of each strap between two top pieces. Sew along the sides and top, securing the two ends of the strap in place. (See photo) When you finish, turn inside out and iron. Repeat with the second strap and the remaining pieces of top.
4. Sew the top of the bag to the body of the bag.
First, make a gathering seam between the two triangles on each piece of body (this is the purpose of those little triangles!) To make a gathering seam, make big stitches, and when you fin-ish, instead of making a knot and cutting the thread, gently pull the thread to gather the fabric. Pull until the space between the triangles is the same size across as the top pieces you worked on earlier. (See photo) Then knot and cut the thread as usual. Sew this gathered area to the bottom of the top of the bag (i.e., not the part that has the straps coming out of it). When you finish, snip the gathering seam and pull it out. Repeat with the second body/top combo.
5. Sew the body of the bag together.
Now you‘re finished with two identical halves of the bag, it‘s time to sew them together. Place the two halves together with the right sides facing in and the sides with the seams facing out. Sew all around the bag.
6. Sew the lining of the bag.
You‘re almost fin-ished! On each of the two lining pieces that you cut out earlier, sew gathering stitches between the two triangles and adjust to the size of the bag‘s top, exactly as you did for the two body pieces. Now, lay the finished igitenge bag (still inside out) on a table in front of you. Lay one of the lining pieces on top, upside down, matching up the gathered seam with the bottom of the bag‘s top piece (see picture). This part is a little tricky – you ba-sically want to sew the lining into the bag by sewing directly over the stitches you made earlier that connected the top piece with the body piece. (See picture) If you do it right, none of the stitches will be visible on the finished bag. Sew one side, then flip the bag over and repeat with the other side. Now, with the lining still ―upside down‖ above the rest of the bag, sew the two lining pieces together, almost all the way around – leave a two or three inch gap somewhere in the bottom.
7. Finishing touches.
Turn the bag inside out by pulling it through the small hole you left in the lining. Sew
up the hole, and you‘re done!
rainy day). All you need are some basic sewing skills and a few simple
materials!
Materials
Igitenge
Lining fabric (I use satiny material, available at any fabric store, but you
could also use a solid cotton or even igitenge if you prefer)
Printed pattern from the following page
Scissors
Needle and thread
1. Cut out the pieces using the pattern.
2. Sew the straps.
Fold in half lengthwise and sew – you‘re basically making a long, skinny tube. When you‘re done sewing, turn it inside out and iron flat. (If you don‘t have an iron, get it wet and lay flat to dry.) Repeat with the second strap.
3. Sew the top of the bag.
Make a sandwich with the two ends of each strap between two top pieces. Sew along the sides and top, securing the two ends of the strap in place. (See photo) When you finish, turn inside out and iron. Repeat with the second strap and the remaining pieces of top.
4. Sew the top of the bag to the body of the bag.
First, make a gathering seam between the two triangles on each piece of body (this is the purpose of those little triangles!) To make a gathering seam, make big stitches, and when you fin-ish, instead of making a knot and cutting the thread, gently pull the thread to gather the fabric. Pull until the space between the triangles is the same size across as the top pieces you worked on earlier. (See photo) Then knot and cut the thread as usual. Sew this gathered area to the bottom of the top of the bag (i.e., not the part that has the straps coming out of it). When you finish, snip the gathering seam and pull it out. Repeat with the second body/top combo.
5. Sew the body of the bag together.
Now you‘re finished with two identical halves of the bag, it‘s time to sew them together. Place the two halves together with the right sides facing in and the sides with the seams facing out. Sew all around the bag.
6. Sew the lining of the bag.
You‘re almost fin-ished! On each of the two lining pieces that you cut out earlier, sew gathering stitches between the two triangles and adjust to the size of the bag‘s top, exactly as you did for the two body pieces. Now, lay the finished igitenge bag (still inside out) on a table in front of you. Lay one of the lining pieces on top, upside down, matching up the gathered seam with the bottom of the bag‘s top piece (see picture). This part is a little tricky – you ba-sically want to sew the lining into the bag by sewing directly over the stitches you made earlier that connected the top piece with the body piece. (See picture) If you do it right, none of the stitches will be visible on the finished bag. Sew one side, then flip the bag over and repeat with the other side. Now, with the lining still ―upside down‖ above the rest of the bag, sew the two lining pieces together, almost all the way around – leave a two or three inch gap somewhere in the bottom.
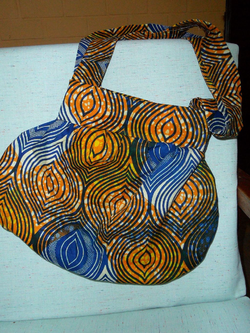
7. Finishing touches.
Turn the bag inside out by pulling it through the small hole you left in the lining. Sew
up the hole, and you‘re done!